CONTENT
- About Vista web buttons
- Quick-start tutorial
- Creating website buttons
- Adjusting web menu appearance
- Setting javascript rollover buttons links
- Creating buttons - sub menus
- Adjusting javascript rollover button
- Setting sub menu buttons links
- Saving vista buttons
- Cascade graphics user guide
- Main window
- Main rollover buttons javascript
- Button builder toolbar
- Button creator - work area
- Toolboxes
- Animated gif image themes toolbox
- Button generator submenu toolbox
- Properties toolbox - main buttons
- Properties of play button
- Normal/Hot state of button gif
- Properties toolbox - submenus
- Web buttons and icons properties
- Normal/Hot state of button images
- Create buttons in theme editor
- Creating theme tutorial
- Java script button states
- Creating new html image button
- Adding graphics and images to the theme
- Setting gif buttons state images
- Adjusting play buttons edges width
- Cool buttons samples
- How to use Vista Buttons with FrontPage
- Insert a dropdown menu to a single page
- Insert a drop menu to many pages by
shared borders
- Insert a popup menu to many pages using
Dynamic Web Template
- How to use Vista Buttons with Dreamweaver. Tutorial
- Insert dreamweaver drop down menu to a single page
- Insert a dreamweaver navigation to many pages using library
- Insert a down menu dreamweaver to many pages using Dynamic Web Template
|
Saving vista buttons
- Now it is time to save your project file. Note that you
are free to save your project at any time. To save project
just click "Save" or "Save As" button on the button builder Toolbar
or select "Save" or "Save As" in the Main
menu. The "Save as�" dialog will appear, where you should
select a place you want project to be saved to, and enter
the project name. After clicking "Ok", project will be saved.
- Also, you can save your menu in the HTML format. To do
it click "File/Save as HTML" in the rollover buttons javascript Main
menu. "Save As�" dialog will appear, where you should
select a path you want your project HTML to be saved to, and
the HTML page name. After clicking Ok, page containing your
menu will be saved.
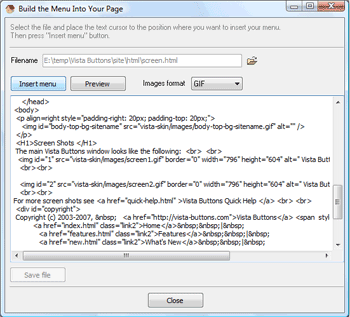
- Also, you can insert your menu into the existing HTML page.
To do so, click "Page insert" button on the button builder Toolbar.
"Build the menu into your page" dialog will appear. Click
"Browse" button to choose a page you want to insert your menu
into. After choosing a page and clicking "Ok", chosen page's
HTML code will appear in the Code field of the dialog.

After that you can edit your code. Then set the cursor to
the line you want menu code to be added to and click the "Insert"
button. The menu code will be inserted into the page. Then
you can either save the page or close the dialog without saving.
|
