Vista-Button.com                
back
next
Refresh
help
Vista Buttons.com Samples    Purchase     Download     Support

Recommended by:


Quick Help

Quick Help
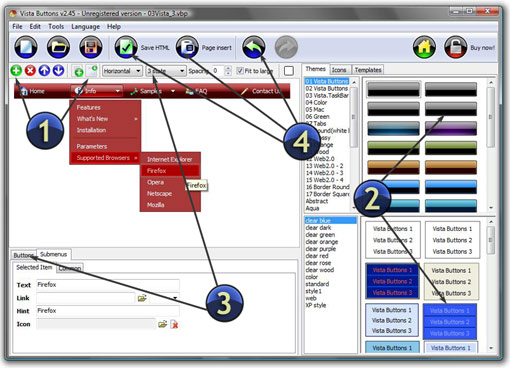
  1. Click "Add button" and "Add submenu's item" buttons situated on the Vista Buttons Toolbar to create your menu. You can also use "Delete selected item", "Delete submenu's item" and move buttons.
  2. You can create your own buttons or use ready to use Templates. To do it just select theme you like in the "Button themes" and "Submenu themes" list. Then you can browse this theme's button backgrounds. When you find a button background or submenu theme you like, double-click it to apply.
  3. Adjust appearance of the menu.
    1.  3.1. Define the menu's orientation and menu type.
    2.  3.2. Select vista button by clicking it and change button appearance for normal and mouse over states and set buttons link properties and link target attributes on the "Buttons" tab.
    3.  3.3. Select submenu's item by clicking it and change submenu's appearance for normal and mouse over states and set submenu's item link properties and link target attributes on the "Submenus" tab.
  4. Save your menu.
    1.  4.1. Save your project file. To save project just click "Save" button on the Toolbar or select "Save" or "Save As�" in the Main menu.
    2.  4.2. Save your menu in the HTML format. To do it click "Save HTML" button on the Toolbar or select "File/Save as HTML..." in the Main menu.
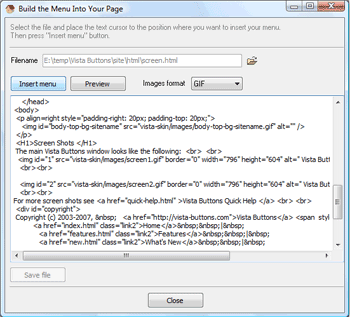
    3.  4.3. Insert your menu into the existing HTML page. To do so, click "Page insert" button on the website buttons Toolbar. "Build the Menu Into Your Page" dialog will appear.

      Quick Help

      Choose a page you want to insert your menu into. Then set the cursor to the line you want menu code to be added to and click the "Insert Menu" button. The menu code will be inserted into the page. Then you can either save the page or close the dialog without saving.